
In the event of a severe weather event, a public health crisis, or other public safety concern, one option available to races is transitioning your event to a Virtual Race, either for all participants or as an option. There are many reasons to host an intentionally virtual race, but this blog addresses best practices for transitioning to a virtual option.
This blog represents a complex set of recommendations for more advanced race directors looking to transition to a virtual option. For the standard recommendations, view this blog.
What is a virtual race?
Virtual races are event (runs/walks) that can be completed by participants anywhere over a range of time.
Why offer a virtual race?
- Allow runners to participate in your race when they cannot physically run together
- Offers a sense of accomplishment similar to the experience of participating in a real event
- Makes treadmill participation an option
- Limits waste of previously ordered medals, bibs and other swag
Setting up Your Virtual Option
Option 1: Add a Virtual Event Option
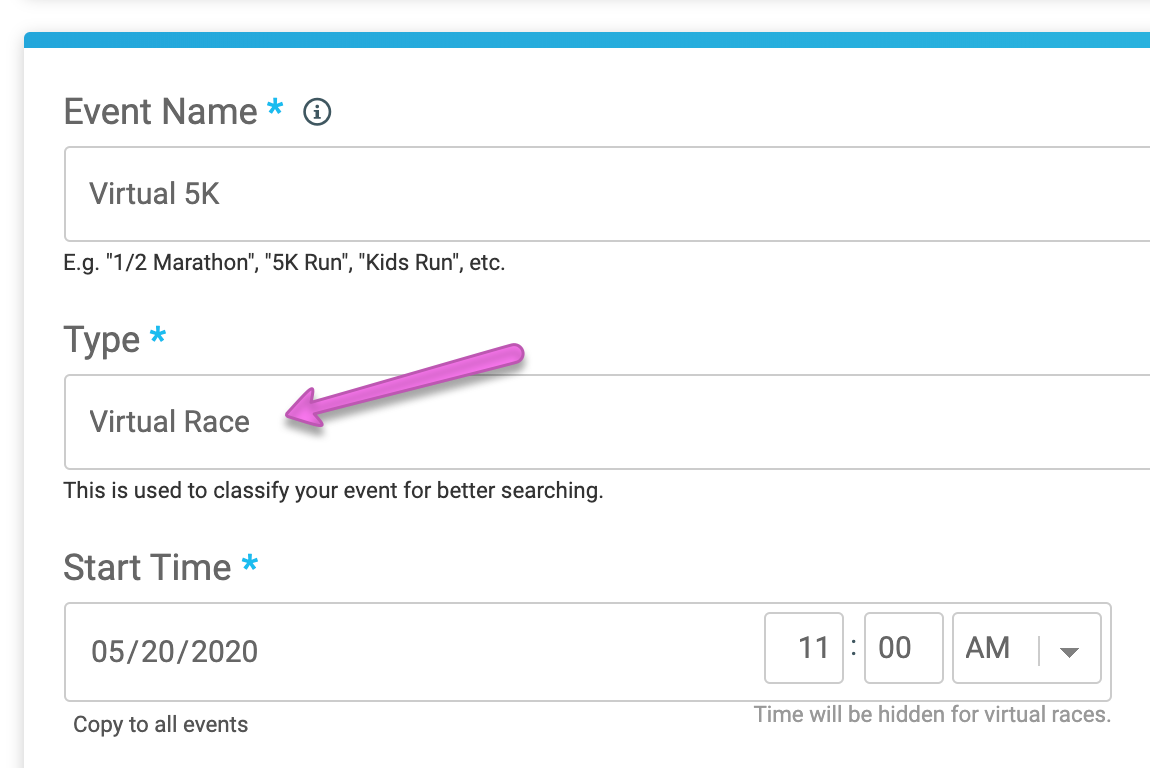
To add a virtual event option that runners can opt to transfer to (or register for directly), setup a new event in the Race Wizard. Make sure you use “Virtual Race” for the Type – this will matter for later steps.
Option 2: Change Existing Event to Virtual
If you are transitioning all participants to a virtual option, you can just change the existing event to virtual. To do this, go to Step 1 of the Race Wizard and change the event type (as above) to Virtual Race, and then follow the remaining steps.
Additional Steps
Multiple Event Distances
If you have more than one event distance, and want all of them to become virtual, make sure you set up options for each of them (I.E., Virtual 5K, Virtual 10K).
Recommended Settings
Shipping
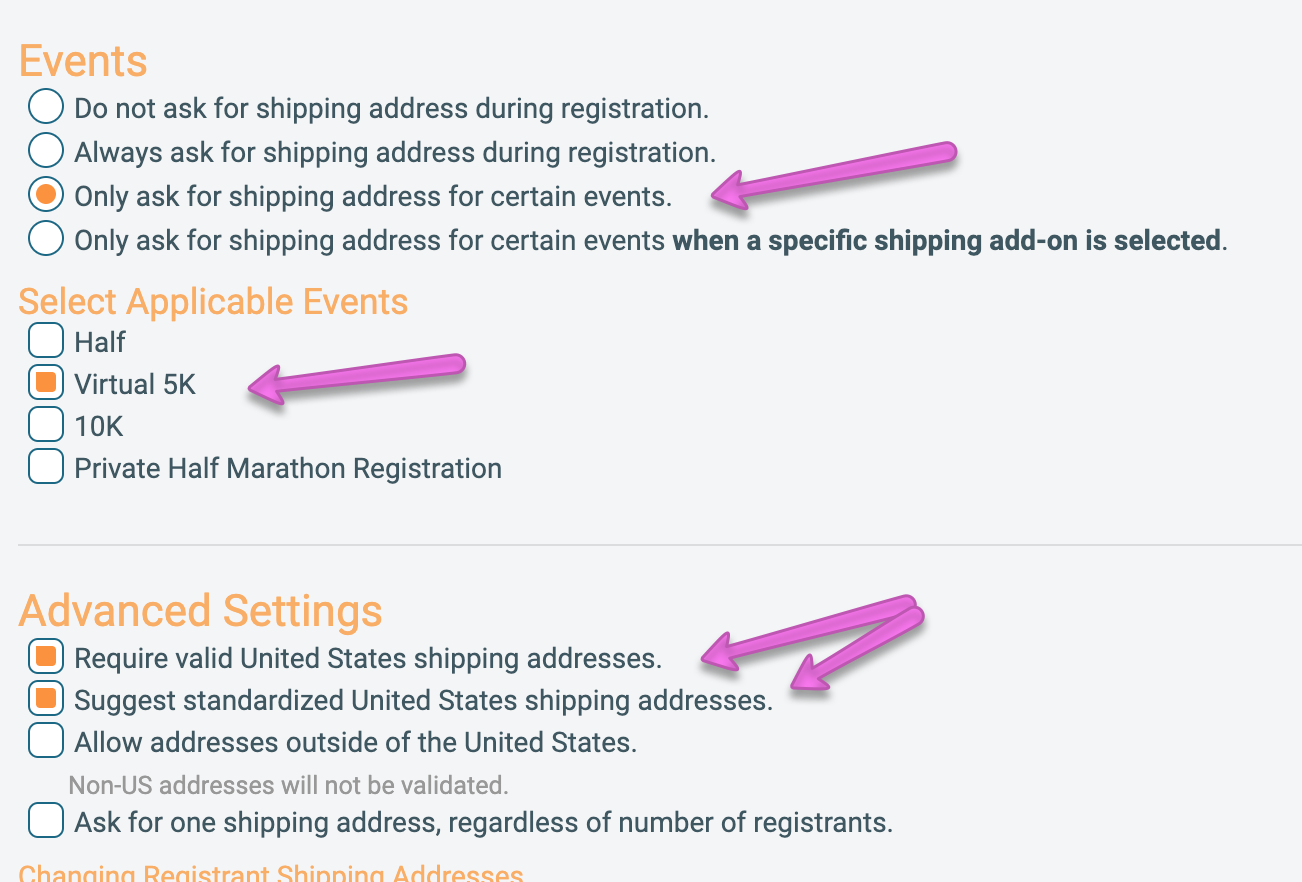
IF you intend to do any shipping of Swag, you will also need to turn on shipping address validation for the event. You can turn this on at race->registration->shipping. This confirms that an address is correct and serves as a reminder to update the address.
Update Your Location
Go to Race -> Race Page -> Race Location
This location is automatically pulled from Step 1 of the race wizard. To set a generic location like “Anywhere!”, add your preferred description to the Custom Location Description, and check the box to Hide the Place section on the race page.


Setting up Text or Email Results
The easiest, most inclusive method for results is to use text or email results. However, this requires an opt-in, meaning your participants will have to go through a transfer process to the newly created Virtual Event, or enable the text option by going to their profile, selecting manage, and going to the “Virtual Race” tab.
Setup Txt email service on your dashboard at RaceDay Tools -> Enhanced Virtual Race -> Setup Enhanced Virtual Race
Pick your virtual event, and set a text message keyword. This keyword is how the system knows what race results are being reported for, so make it something you think your runners will understand.

You must turn on bib assignment. If this is not already setup and the bib numbers don’t matter, you can setup automatic bib assignment at RaceDay Tools -> Bibs -> Assign Bibs & Chips. Bib numbers ensure that a runner can be associated with a txt result.


Define Your Time Range
Determine when results are valid. This window will depend on what time range you give runners to complete the virtual event.

Define Results Set
Pick a pre-created result set or create a new one called Virtual Race, etc. to direct all texted results in this set.

Setup Valid Times
This can help weed out people who simply mistype their results. If you allow participants to report finishing without a time, this can be more inclusive for runners who are more private, but would like acknowledgement as a finisher.

Setup your communications
We automatically create a page that has instructions for your runners to reference for reporting results. Use our replacement tags and your own language to setup emails and texts for reminders about the events, instructions, for posting results, and up to three additional messages.


Runners will also have the option to post their results directly from the website when they are signed in. This link is the same as the auto-created page with instructions for sending in results:

What your Runners See:
Runners who are registering (or transferring) to the virtual event will get an opt-in page for the text and email results option.

When your text messages go out, they will look something like this:

Their results will show up something like this:

If you elect not to use the Virtual Race Text/Email reporting through the system, other options we see for collecting results include:
- Google Form: Create a Google Form that runners can use to submit results
- Email Results: Participants email the results and the race director posts the results
- Photo Proof: Participants send a picture of their Garmin/Strava/Fitbit/MapMyRun finishing time and the race director posts
- No Results: No results posted.
How your Runners Transfer
Now that your virtual event is setup, it’s time to get people into it. In order to participate in the text message option, they will need to be transferred to the new event.
Option 1: Runner Self-Transfer
Make sure you have enabled event transfers at Participants -> Participant Management -> Event Transfer. Make sure you prohibit transfers that are not to the virtual event.
Recommended methods for encouraging self-serve transfer include:
- Add or edit a Cover Page (Race -> Race Page -> Cover Page) section with an explanation of the transfer process (this how-to is a good starting point)
- Send an email to your participants with the transfer instructions above, and include the Edit Registration tag to jumpstart the process
- Share your updates on social media
- Send a reminder email to participants who do not complete the process
What if some participants do not complete the tranfer?
If you are requiring all participants to participate in the virtual event, you can also move some or all of them to the virtual event through regular participant management like this.
If you used the pop-up tool to collect registrants who wish to switch to the virtual option and do not want to require a separate step of self-transferring, you can use the participant management options (select “manage” by the participant’s name) to transfer each person to the new event.
Please note that anyone that is transferred by the race director will only be able to text or email in their results if they manage their registration by going to their profile, managing their registration, and going to Virtual Races (as detailed in the section below).
Option 2: Results Opt-In
It you selected Option 2 above and changed your existing event to a virtual one, you still want to communicate with your participants to get them setup to submit results.
- Each participant will need to go to their profile, find your races, and select “Manage Registration”.

- Virtual Race will show up as one of their participant management options, and from here they can enable text or email results, or submit directly from the site.
Note: the participant management link for Virtual Race will ONLY show up during the period set to accept results. For this reason, we recommend making a broad window to accept results and setting it to start before you contact your participants.
Use Virtual Communities to enhance your virtual race
Use social media to replicate the social excitement of race day. A few ways to do that:
- Create a Facebook Group and promote it amongst virtual participants as a place to share race completion selfies and encouragement
- Use your existing Facebook Page as a hub to share completion selfies and encouragement
- Create a hashtag to use on Instagram, Facebook, and other social media for the sharing of selfies and race stories. Share posts from your main accounts!
Make sure all your communications include information about submitting results!
Swag Plan
Create (and communicate) a plan for any swag for the event. Options include:
- Offer pickup at a later race
- Offer a TBD pickup at a local running store or event. You may want to wait to determine the pickup point/time to prevent another postponement
- Offer to ship swag. This is convenient for runners, but can be challenging and expensive for a race. If you plan to use this option, requiring shipping validation and actually having runners transfer themselves is recommended.
- Do not offer swag – either it hasn’t been ordered yet, or you opt to donate it/use it for another event


