
There are many advanced features built into our new ticketing platform. This list will keep expanding over the coming months:
- Add Access: give access to other event managers
- Customize notifications
- Google and Facebook tracking options
- Social sharing options
- Referral rewards
- Store
- Refund Reserve
- Coupons
- Extra Fees
- Donations
Secure Access
This tab on the event dashboard allows you to add another event director. If you want them to be able to access your Payment Account, that must be done separately through the link on this page.
Notifications

This tab allows you to enter the email address that you want to receive notifications from your event under “Additional Email Addresses.” If you don’t add one, you will receive emails to the address already attached to your account.
If you click on “Tickets Purchased,” it will bring you to a screen where you can make changes to the way that confirmation emails appear.

We have a default notification that is sent whenever a ticket is purchased. You have the ability to enter your own HTML to customize the look and content. The details of the purchase will automatically populate into the correct fields.
Facebook and Google Analytics Tracking
Enter your Facebook and Google Analytics tracking IDs, and we will automatically add the code to your ticket website and checkout pages. This will allow you to use those systems to track clicks and conversions down to the dollar amount. We also fully support Google cross-domain tracking.

Store
As shown above, additional items can be added to the ticket purchase path or a separate page to allow supporters to purchase items. To set this up, enter the Store Setup page on your Nonprofit Ticket Dashboard:

This summary page allows you to add or edit items, set quantities and display settings. It also allows you to drag and drop to reorder how items are displayed.“Edit item” allows you to set the name, price (as well as a strikethrough price), and whether the item will be available during ticket purchase or in the stand-alone store.

Variants are for items that might have multiple variations. Here is a simple single variant example:

Here is a two variant option with size and color (note, you will be able to set price and quantities on other setup pages):

Here is how that would appear on the store page:

There is support for up to 3 variants.

Display Options
An image and description can be set for each item:

Variant Pricing
Variant pricing is useful for variants that might cost more like XXL shirts.

The pricing displays when you pick the variant:

Store Quantities
This feature allows you to force ticket buyers to add an item to every transaction. For example, if they need to pay for a parking pass, you can add that to their purchase path. To do this, you can set a minimum quantity per order or per ticket. The per ticket option ensures that each individual ticket holder must buy at least one of the required items while registering. In the case of a parking pass, though, you may want to use the minimum quantity per order option, because this only requires a purchase with every transaction and not every individual ticket. This makes sense because in many cases, event attendees who bought tickets together will also drive together.

This is what happens if someone tries to buy zero parking passes when at least one is required:

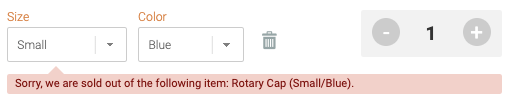
The Quantities setting also allows per variant quantities to be tracked, and will show “sold out” when there are no more available of the variant combination.

Here is the message the user sees when an item has been sold out:
Store Order Report
Store orders are also available in a consolidated report that can be searched and downloaded as a spreadsheet.

Extra Fees
Extra fees are useful for many smaller “hidden” costs, such as shipping costs, sales tax, or venue fees. Like store items, fees can be added to every transaction, to every ticket, or only to certain ticket groups and levels. Fee amounts can be based on a percentage of the sale or a specific dollar amount (or both, such as five percent plus two dollars). You can also specify store items to which the extra fee applies. 
Coupons
The Coupons tab is located under “Financial.” Coupons are a way to give discounts to certain registrants, and can be helpful marketing tools for your event.
The simple coupon features are:
- Set one or multiple codes at once
- Set start and end dates for coupon validity
- Set a combination of percentage or dollar amount off (such as 10% plus one dollar off)
- Overall discount or per ticket discount

There are advanced options as well:
- Choose which items the coupon applies to–these can be tickets only, tickets and fees, store items, store fees, or some combination of these items.
- Limit number of uses (example: the first 50 people who buy tickets get to use this coupon)
- Set a certain number of tickets on which the coupon can be used (example: our sponsor Wegmans gets 50 free tickets)
- Limit to a certain number of tickets per transaction (example: only allow 2 tickets from a transaction to get the discount)
- Set a minimum cart value (example: coupon only applies to orders over $100)
- Limit to specific ticket groups or ticket levels (example: only Friday attendees can use this coupon)
- Tags allow you to do reports across multiple coupons (example: a “sponsor” tag can be used to show all coupons to all sponsors)
- Notes (these are used internally to describe coupons)

Here is what it looks like when a coupon is applied:
You can view all your coupons at once:

Coupon Reports
Like the other financial reports, these provide a quick summary report of coupons, as well as searchable, downloadable, detailed reports.


Coupon Pools
Coupon Pools allow you to share coupons across multiple run/walk/rides and ticket events. You can set up one pool and share that across all of your run/walk/rides and ticket events, or you can set up multiple pools if you have different types of events that have different types of coupons. For example, you may have a set of event coupons used for all of your golf outings, and a set of coupons used for all of your spaghetti dinners.
To access your coupon pools, click this ![]() button on the Event Dashboard’s Coupons page. There you can search your coupon pools. To share your coupons in a pool, click on Manage Coupon Pools. You will see two tags for sharing – one for “read only” if you do not want other events to edit your coupons, and “read/write” if you want the other events to be able to edit them.
button on the Event Dashboard’s Coupons page. There you can search your coupon pools. To share your coupons in a pool, click on Manage Coupon Pools. You will see two tags for sharing – one for “read only” if you do not want other events to edit your coupons, and “read/write” if you want the other events to be able to edit them.
Now you or another event director can copy and paste the appropriate tag into the “Use Shared Pool” box in the other event.

All the coupons associated with that pool are automatically added to the other event.
Donations
Another advanced feature of ticket events is donations; you can read more about them here.
Read more about our new RunSignup for Nonprofits technology:
Ticket Event Reports and Management
8 thoughts on “Advanced Features for Ticket Events”
-
Pingback: Donation Features for Nonprofits – RunSignup
-
Pingback: Ticket Event Reports and Management – RunSignup
-
Pingback: How to Set Up a Ticket Event – RunSignup
-
Pingback: Early Adopter Program: RunSignup for Nonprofits – RunSignup
-
Pingback: RunSignup for Nonprofits: Early Adopter Webinar – RunSignup
-
Pingback: Donation Websites – RunSignup
-
Pingback: Nonprofit Dashboard – RunSignup
-
Pingback: New Voucher Feature Helps Events Migrate to RunSignup | GiveSignup – RunSignup Blog
Leave a Reply