
Update: Partner Websites are live on production as of 12/2/2015. We have some customers that were on old WordPress Sites, and those will be shut down at some point and we encourage moving to this new platform.
We have extended our Free Race and Club Website capability to our Partners who manage multiple races. The Partner Website makes it easy for timers and race series to have a website that is driven directly from the RunSignUp database, making things like upcoming race lists and results lists very simple to manage.
Partner websites are available for free to our large partners with over 5,000 registrations per year and more than 10 races. It is built to be self-serve so that you can build and manage the website yourself. Learn more about the Partner Program.
Partner Websites have a number of features:
- Native Mobile Race Website
- Automatically created and updated integrated Components for common things like:
- Upcoming Race List
- Results
- Image Galleries
- Contacts Us
- Sponsors
- Instagram Feed
- YouTube Videos
- Add your own Custom Pages for things like Timing Services, Frequently Asked Questions, About Us, etc.
- Fully integrated with the database – for example when a race is added to your partnership, it automatically appears on your Upcoming Races list.
- Map your domain to the website so your customers will see MyTimingWebsite.com/Results.
- Your own Logo and Cover Photo are the highlight of your site (no ads)
- Pick your own color palette
- Continuous improvements that are made by RunSignUp without any effort on your part to add features and improve the functionality
Here is a video overview of features and how to build your own website (we forgot to mention a few features like the ability to customize the colors):
How To Build Your Own Partner Website
Here is a simple example that took less than 30 minutes to create. Note how it has a completely dynamic list of upcoming races on the sidebar on the left, has content with interspersed images and text, and has dynamic race calendar and results listing, a page to show an Image Library, and a secure Contact Us page:

Step 1 – Setup
Simply enter in the website name you want to use (it defaults to your Partner name). A URL of “https://PartnerName.RSUPartner.com” is automatically created. We have an explanation in another blog about how you can qualify and set up your own domain to be mapped to this website – PartnerName.com.

Website Structure
Your Website will have this basic structure:

HomePage
The first thing you want to do is create your Homepage, where there is a dedicated menu item for this.

You will need to add one of more Sections to the Homepage.
Sections
Sections are where the real content is added. For the example in this blog, we only have one section on the homepage (that you see at the top). Here is the setup:

 The heading will show with a separator line under it as shown on the right (Bob Bickel Partner Website).
The content can be any text with any number of links. Note you can format the text – for example I used a “heading” format for the “Your Home for Race Registration!”, and then the regular paragraph format for the rest. You do have the ability to put in your own HTML if you are familiar with that.
You can also upload an image as we did in this example. We resize the image based on the alignment you select. In this case the image is made smaller and aligned on the right hand side. As you can see, you have the ability to put images to the right or left or below the content.
If you want multiple images on a page, then you can create multiple Sections, or see the section below on Images for displaying a number of images together in a gallery.
Pages
Now that you have a Homepage, you can add pages. Here are the pages that make up this example:

 Editing Pages
When you first create a page or edit the page, you can configure it with the following options:
Page Name – this will also appear on the Menu and the top of the page.
Page Display – You will typically display the page as a Menu Item. Primary Menu Items show at the top of every page.
Secondary Menu Item – This is for pages that can be grouped together, for example the “Our People” and “Contact Us”:
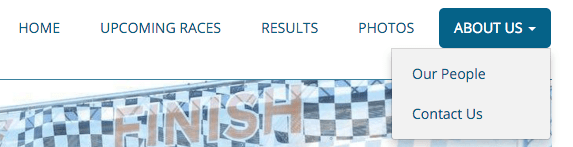
If you need to create a Menu grouping, simply select that on the Secondary Menu option list:

Page URL – We default to the page name, but you can set this to whatever you want.
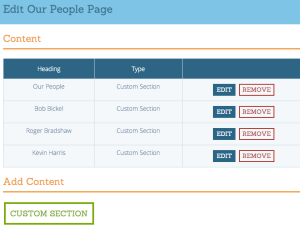 Page Content – Sections
After you create a Page, you add Sections to put content in. Sections allow you to break a page into multiple sections of content, which you will see is simple, but very powerful. Here is a screen shot of how there can be multiple Sections on a page on the right.
Menu Ordering
You can also order the menus on your Partner Website:

Simple Content Section
Sections can have text content and an image – so if you Create or Edit a Section, the top part will look like this, with a Section Heading, a text area (you can also enter HTML code with the little “<>” sign on the top right of the editor), and an image or PDF file.

 You also have the ability to position the image as shown on the right. You can also hide the Section Header. The example below shows a right justified image and showing the header on the Section.

Multiple Sections
You can put multiple sections together on a page as we did in the page:

 Embed Integrated Component Sections
This is probably the coolest feature of the Partner Website – the ability to add dynamic components with a simple option list. This is on the bottom of the Edit Content page, so you can add these Components after some content or a heading, or not put any text above and just have the component appear. Remember you can have multiple Sections on any Page and you can mix and match content and Components.
Upcoming Races Component
This is one of the most powerful component and provides a mechanism for you to have a page with an automatic  rolling calendar of your races. That means once the weekend has passed, the next weekend’s races are at the top of the list. As you add races in RunSignUp – either full registration or a listing that points to another registration site – they will appear automatically. (You will learn later how to customize the colors)
 Results Component
You also have a Results Component. This will list the most recently completed races, and only those that you have uploaded results for. We have added a mechanism covered in another blog to easily upload results in the Partner Website that will be convenient for timers who need to upload years of old TXT and HTML result files. Once they are uploaded, you have them in a central place and display happens automatically.
Contact Form
 This provides a secure way for people to contact you without publicizing your email address. When people submit questions in this form, they are automatically sent to your email that you set up in your Partner Account for Contact purposes (so it can be info@mytimingbusiness.com).
Sponsors
We provide a simple way for you to upload Sponsor images and to show them on a page or in sidebars (learn more about Sidebars below).
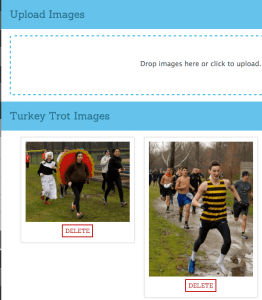
 Images
This is the beginning of a lot of cool stuff we will be doing with images. For now it is a way to upload a set of images and have them displayed in a Gallery View as shown on the right. It simply rotates thru the pictures, or you can click the arrow to advance them.
Image Buckets
To display images, you need to load them with into an Image Bucket. This is under Media. Once you Create an Image Bucket, you can upload as many photos as you want. When we display them on your website we do automatic resizing and optimizing of the photos – so mobile phones won’t have to load as much data.
Theme and Cover Photo
Now that you have created a couple of pages, you can make your website more customized.
The first thing you want to do, is make sure you have uploaded your Partner Logo, as this is used at the top right of your website. You upload that under the Account -> Partner Info -> Partner Logo.
Next, go to Website ->Theme. This is exactly like the Race Website Theme, where you can pick or set the color scheme as well as an image that displays at the top of each page. This must be 1200 X 400, but we will be adding the capability to have other heights.

 Sidebars
You can also add a sidebar with multiple items of content. For example, this sidebar on the right is a list of upcoming races that are tied to your Partnership. This is setup by going to the Sidebar setup page. The setup page works the same way pages work, where you can have multiple Sections per Sidebar.
Sponsors is another Component that makes a nice Sidebar. Again, the images will automatically adjust and optimize size, and will adjust to mobile devices. For example, here is where a sponsor sidebar normally on the left would appear on a mobile device at the bottom of the page:

Summary
As you can see, this is a powerful tool for building and creating a website for Timers, Race Event Managers and Race Series. We have a number of other nice additions coming on this, so make sure to stay up to date on the blog.
Nice Blog Post